Welcome to the SansGUI Quick Tour. We will guide you through some of the examples that demonstrate the useful features available to you in the SansGUI environment. All the examples in this section can be found in the samples subdirectory under the SansGUI installation directory. Each project has its own directory containing all of the related files and source code. Normally, the SansGUI installation process sets samples as the default working directory. If your Windows default document directory is set to My Document, you will have to navigate through the SansGUI installation directory and find the samples subdirectory.
It is recommended that you follow through the Points of Attraction in order because the first two examples are shown in greater details than the later ones.
Point of Attraction 1: Cool demonstrates a simplistic model of a cooling cup of coffee. Multiple cups of coffee can be added to show the object-oriented nature of SansGUI. Projects with source files for both C/C++ and Fortran implementation are included.
Point of Attraction 2: MatPlot shows how to generate a sine and a cosine waves by DLL functions written in C/C++ or Fortran and store the data points in a matrix. The matrix can then be looked up during a simulation run and the values can be plotted. Projects with source files for both C/C++ and Fortran implementation are included.
Point of Attraction 3: Feel shows a dynamic model of human feelings while pushing a ball and bumping into an obstacle. This example has been implemented in C/C++.
Point of Attraction 4: IAC is an artificial neural network model to demonstrate inexact and associative information retrieval in a database. Projects with source files for both C/C++ and Fortran implementation are included.
Point of Attraction 5: Solid explores the new interactive 3D graphics features in SansGUI and demonstrates how SansGUI supports OpenGL graphics programming directly in Microsoft Visual C++ and Compaq Visual Fortran.
Point of Attraction 6: Salty demonstrates all possible GUI control types and some of the supported class types in SansGUI.
Please consult the Installation Procedures if you haven't had SansGUI installed.
Run SansGUI by double clicking on the SansGUI icon on the Windows desktop, or selecting SansGUI from the start menu Start>Programs>SansGUI 1.0>SansGUI. We use this typographical convention to indicate menu selection paths throughout the SansGUI manuals. The SansGUI 1.0 in the path is the folder name decided during the installation. It may be different depending on your choice.
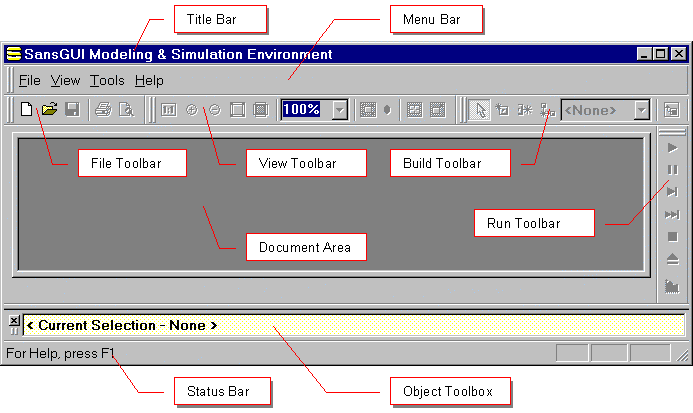
The following picture shows the controls in the SansGUI Modeling and Simulation Environment. The Title Bar identifies the SansGUI environment and is also used to indicate the currently active document, when there is one or more opened. The Menu Bar contains pull-down menus for operations. The available Toolbars are: File, View, Build, and Run. You can dock the toolbars (default), or make them float by dragging their handles and moving them about the environment.
The major portion of the SansGUI window is the Document Area where Project Models, Object Libraries, and Schema Definitions can be opened. There will be a tab created at the bottom of the document area for each opened document. Below the document area is a docked Object Toolbox, which contains most-recently selected component objects for parts creation. This toolbox can be made floating just as the toolbars. At the very bottom is the Status Bar where the usage of each menu bar item or toolbar button is displayed. When you don't know the operation of a particular toolbar button, you can move the mouse pointer to the button and let it sit there for a second or two. A tool tip will be displayed with a longer description shown in the status bar.
For the following Points of Attraction, you will open the specific files by selecting the Open menu item in the File menu (Open>File, in our typographical convention) or click on the Open button on the File Toolbar. A pop-up dialog will be displayed for you to select the file to be opened.
When a cup of hot coffee is place in the room temperature, it cools down according to the shape and material of the cup and the temperature of the surrounding air. The physics involved are convection, radiation, evaporation, and conduction. In this beginning example, however, we simulate the cooling effect of a cup of coffee in a very simplistic manner:
Temperature(T+dT) = Temperature(T) + (-R) × (Temperature(T) - RoomTemperature) × dT
where T is the simulated time, dT is the time step, R is the cooling constant, Temperature(T) is the temperature of the coffee at time T and RoomTemperature is an input attribute, which will stay constant throughout the simulation. At each time step, the difference of the coffee temperature and the room temperature is taking into account; therefore, when the difference is smaller, the cooling effect will also be smaller.
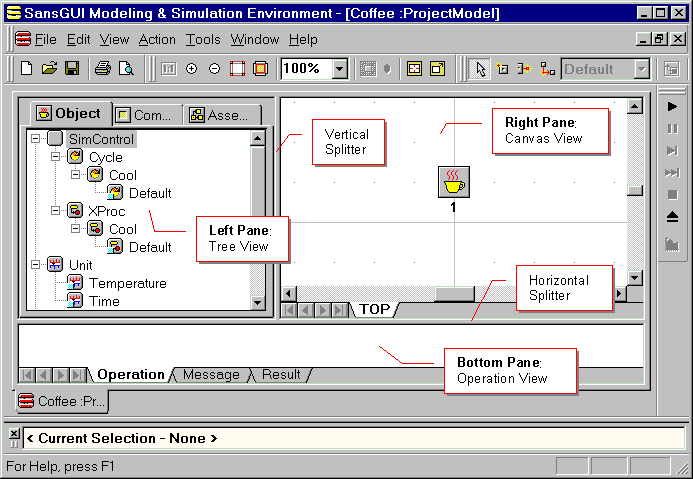
Locate and open the Coffee.sgp file under the samples\Cool directory. Each SansGUI file is displayed by a tri-pane document window:
Left Pane: contains tabbed (at top) folders to display tree views of classes, objects, components or assemblies.
Right Pane: contains tabbed (at bottom) views for components on Canvas Views or component data in Grid Views. The tabs reflect the most recent components being accessed.
Bottom Pane: contains Operation, Message, Result or other views to allow SansGUI to communicate with the user.
If the Bottom Pane is invisible, you can drag the horizontal splitter up to reduce the heights of the Left and Right Panes to reveal it. The widths of the Left and Right Panes can be adjusted by moving the vertical splitter. If you don't see the coffee cup icon on the Canvas View, click on the empty canvas to activate the view so that the buttons on the View Toolbar are activated, or turned into color buttons, and then click on the toolbar button Center on the View Toolbar to display the center area of the TOP assembly.
Throughout the SansGUI manuals, we use a period . as the delimiter between a class and its subclass and an underscore _ as the delimiter between a class identifier and the name of an object that is derived from the class. Each object in the Tree View has a small light blue color square at the lower left corner of its icon and each part has a small dark blue square at the same corner.
Once you have the three panes in the document window, examine the default simulation control object by either double clicking on the SimControl.Cycle.Cool_Default object or by right clicking on the default object to get the Context Menu and then select (left click) Properties from the menu items. Later on, we will simplify this and other similar actions by describing them in the form of Context Menu>Properties. An Object Properties dialog is displayed for the simulation control object. The time step is preset to 0.1 and the current time is 0. The room temperature is set to 22 degrees Centigrade. Please notice that there is a blue square to the right of the Current Time attribute. This indicates that the value of the Current Time will be logged to the Result View at each evaluation cycle during the simulation. You can change the values if you like, but for now, let's just continue on by clicking on the OK button.
Now, let's run the simulation by clicking on the Run In-Process button located on the Run Toolbar. A few operations are shown in the Operation View of the Bottom Pane. The last two lines indicate that the end of the cycle-driven simulation is reached with a time stamp. Switching to the Result View at the Bottom Pane by clicking on its tab, you will find a Grid View with three columns: the cycle number, the simulated time, and the temperature of the coffee. You can see the long names of these attributes by moving the mouse pointer to the column headers.
There are [L] and [Y] appended to the Current Time and the Temperature attribute names, respectively. They are the indicators for the SansGUI plotting tool to know that we use the values in Current Time as the X-axis labels and the values in Temperature as the Y-axis data. Click on the Plot Results button on the Run Toolbar to obtain a data curve plotted in a pop-up window. You can convert the temperature measuring unit to Fahrenheit by clicking on the degC unit label of the column, clicking on the drop-down button (an upside down triangle) to reveal the list of units, and then selecting degF. Once it is selected, replot the curve by clicking on the Plot Results button again.
Close the Plot Results window by clicking on the X button on the title bar of the window. We will now move on to the multiple cups of coffee simulation.
Let's create three cups of coffee for the next simulation. Please follow the directions below:
Click on the Component tab in the Left Pane to see the Base Components. Find the object Base.CoffeeCup_MyCoffeeCup (with a light blue square indicator) and click on it once.
Look at the Object Toolbox, you should see the object being selected.
Click once on the Canvas View with the tab marked TOP to activate the view.
Click on the New Part button on the Build Toolbar.
Move the mouse pointer into the Canvas View. The cursor is changed to a small +.
Locate an empty spot near the first cup and click on it once. A new cup (a new part) is created with the label 2.
Repeat the last step to create a new cup 3.
Click on the Base.CoffeeCup class in the Left Pane. The Right Pane should show a Grid View of the values of all three cups. The first cup has the temperature value in red, meaning that it has a part override value from the previous simulation run. The two new cups just inherit all the values from the MyCoffeeCup object.
Clear out the part override values by selecting Edit>Clear Override Values from the Menu Bar. The temperature of the first cup should be reset to its original value, with the number turned back to black.
Scroll the grid if necessary to reveal the Cooling Constant (fR) column. They should now all have 0.75. Click on the cell for the cooling constant of the second cup and change the value to 1.0. The value will be displayed in red when you finish editing the cell, indicating a part override value.
Press the DownArrow key on your keyboard to move the current cell to the cooling constant of the third cup. Change its value to 1.5. The value is displayed in red, again.
Click on the Object tab in the Left Pane and double click on the default simulation control object SimControl.Cycle.Cool_Default to open up the Object Properties dialog.
Reset the Current Time value back to 0 by clicking on the value cell and type over the old value (2) with the number 0.
Click on the OK button to commit the change.
If you are running the demonstration version (SGdemo), skip this step. Otherwise, save the Project Model by selecting File>Save As and type in Coffee3 as the new name in the Save As dialog.
Click on the Run In-Process button on the Run Toolbar.
Once the simulation ends, select the Result tab in the Bottom Pane. Check the simulation results.
From the Result data grid, right click on any cell in the fTemp column of coffee cup 2. Use the Context Menu to select Context Menu>Set As Y Data. There is a [Y] appended to the fTemp attribute name in the column header. This operation adds the data in the current column to the plot specification.
Do the plot specification for the fTemp of coffee cup 3 in the same way as in the last step.
Click on the Plot Results button on the Run Toolbar to see the data curves.
There is a five coffee cups example project Coffee5.sgp in the same directory. Load it and see if you can get to the point of plotting the data curves.
The Developer's Corner sections in this tour require the SansGUI Development Environment for hands-on practices. If you have the SansGUI Demonstration (SGdemo) or Run-Time (SGrun) license option installed, indicated in the Help>About SansGUI... dialog, you can obtain a full featured SGpro evaluation license key by filling up a registration form on-line. If you are not a developer, you can either skim through this section or skip to the next Point of Attraction.
There are three classes in simulator Cool. The Schema Definition is in the file Cool.sgs in the samples\Cool directory. Use File>Open menu selection to obtain the Open dialog and then choose Schema Definition from the Files of Type drop-down list. Click on the Cool.sgs file with a blue SansGUI icon, indicating that it is a Schema Definition. There are three tabbed Tree Views in the Left Pane:
|
Tab |
Description |
|
Simulator |
contains simulation control classes and unit objects |
|
Component |
contains component classes for parts and links on Canvas Views |
|
Reference |
contains reference classes for named references |
Click on a class name to reveal the attributes in a Grid View in the Right Pane. The classes introduced in this Schema Definition are:
SimControl.Cycle.Cool: for global attributes to be accessible by all objects during the simulation. In this class we've added Time Step (fDT), Current Time (fTime), and Room Temperature (fRoomT) attributes to the original set of attributes inherited from class Cycle. The parenthesized names are displayed in the code column of the Grid View and should be unique. They are used as variable names in the source code generation process of the SansGUI framework. We use a lower case f prefix in the variable names to indicate those of single precision floating point type variables.
SimControl.XProc.Cool: for external process simulator control. We created this class simply to show how a textual Model File can be generated and passed to an external process simulator. No additional attribute is added to this class.
Base.CoffeeCup under the Component tab: for the coffee cup objects and parts to be created by the user. This class contains two attributes: Temperature (fTemp) and Cooling Constant (fR)
Collection.Clock under the Reference tab: for the clock advancing routine. It has no class attribute, but just accesses the simulation control object and advances the current time at each evaluation cycle.
In addition to the attributes in the Grid View, a class contains some other properties accessible by double clicking on the class name in the Tree View, or selecting from the Context Menu, Context Menu>Properties. There is a DLL tab in the Component and Reference classes' properties. It contains the specifications of Dynamic Link Library function entry points for SansGUI to call during the simulation. For CoffeeCup and Clock classes, verify that the Call column has a check mark in the Evaluation row.
For the behavior of the CoffeeCup and Clock classes, you can start up Microsoft Visual C++ (MSVC++) or Compaq Visual Fortran (CVF) Interactive Development Environment (IDE) and then load the project workspace from samples\Cool\Cool_1_0\Cool_1_0.dsw (for MSVC++) or samples\Cool\Cool_1_0F\Cool_1_0F.dsw (for CVF).
Take a look at the code in functions SG_xEval_Base_CoffeeCup() and SG_xEval_Collection_Clock() to see how simple they are implemented for tightly coupling with SansGUI. The skeleton of the functions in the source files are generated by SansGUI. The manually added on codes are after the TODO comments. Because all the data values in SansGUI Data Objects are in arrays, all Fortran variables in this example have an array subscript 1.
The calculation formula stated previously is implemented in SG_xEval_Base_CoffeeCup()and the clock advancing function simply implements:
CurrentTime = CurrentTime + dT
The SansGUI Data Object format and the API prototype can be found in inc\SGdll.h for C/C++ and in inc\SGdllf.h for Fortran. Consult the Developer's Guide for more details. Here we just list out a few notes related to simulator Cool:
In the Fortran implementation, we use the POINTER extension in Compaq Visual Fortran to access indirect C structure members in SansGUI Data Object SG_OBJ. As a result, the declaration portion of the code is longer than that of C, but the actual calculations are the same.
The clock driver is needed because only parts and reference objects are called upon by SansGUI.
Do not advance the clock in the coffee cup evaluation function because there may be more than one cup and; therefore, the clock may be advanced multiple times per cycle.
Do not create multiple clock driver objects for the same reason as avoiding from multiple clock updates per cycle.
The DLL project is a Win32 Dynamic-Link Library (MSVC++) or a Fortran Dynamic Link Library (CVF). For C/C++ developers, do not use the Debug mode to create DLLs for SansGUI because your version of SansGUI is built with the Release mode and with multi-thread (MT) class library enabled. Instead, create a Trace mode by copying the Release mode parameters and manually turn on the debug information in the settings. See the Trace mode of project Cool for an example. To trace the program in your MSVC++ or CVF IDE, load the corresponding project workspace described above.
Select the Trace mode if it is otherwise (Debug or Release) when you use Visual C++.
If you use Compaq Visual Fortran, there is no conflict in the run-time libraries. Therefore, the original Debug and Release mode settings are fine. Just select the Debug mode to trace the program.
Select Project>Settings... to open the Project Settings dialog
Under the Debug tab, make sure the Executable for Debug Session has the SansGUI.exe in the correct path in your installation. If not, use the right arrow button next to the field to locate it.
Make sure the Working directory is the samples\Cool subdirectory of your installation.
Set a break point in the arithmetic equation in either SG_xEval_Base_CoffeeCup() or SG_xEval_Collection_Clock().
Click on the Go button or press the F5 key to start a trace session.
If the IDE needs to rebuild the project, do it. If the compiler cannot find the SGdll.h or SGdllf.h include file, you need to add the inc subdirectory of your SansGUI installation directory into your IDE from the Directories tab via Tools>Options... Add the directory in the Include files directories.
If the IDE warns you that SansGUI does not have debug information built in, it is fine. Continue on the trace session.
At this point, SansGUI will start to run and everything should work as if there were no tracing involved.
Load the Project Model Coffee3.sgp that you have just created for the Multiple Cups of Coffee example. Open the simulation control object SimControl.Cycle.Cool_Default by double clicking on its name or icon.
Right click on the empty value cell of the Simulation Program Path field. An Input Assistant context menu should come up. Select it.
Find the <File / Dir>... button under the empty field and click on it.
Use the File Locator dialog to navigate into either Cool_1_0\Trace (for MSVC++) or Cool_1_0F\Debug (for CVF) and locate Cool_1_0.DLL (for MSVC++) or Cool_1_0F.DLL (for CVF). Select it and close all the dialogs by clicking on the OK button.
Run the simulation as before. The debugger in your IDE will stop at the break point you just set before. You can examine the values as you would in your regular program development.
Gould, Harvey and Tobochnik, Jan. 1988. An Introduction to Computer Simulation Methods, Part I, Addison-Wesley Publishing Company, Reading, Massachusetts.
In this example, we show how to generate the data for one circular cycle (360 degrees) of a sine and a cosine waves and store them in a two column matrix. We then run two circular cycles (720 degrees) to look up the data from the matrix and calculate the sum of the two curves. At each degree of angle, the amplitude of the sine and cosine wave and their sum are logged in the simulation control object for plotting. Please note that the cycle control attributes in the simulation control object refer to the evaluation of all objects in the model at each degree of angle, not the theoretic cycle in the sine or cosine waves.
Open the Project Model MatTest.sgp from the samples\MatPlot directory. There is no component object in this model; therefore, there is no part on the Canvas View of the TOP assembly. Looking into the Left Pane, if the Object tab is not selected, click on it to reveal the SimControl classes. In the Tree View, two objects are of primary concern:
SimControl.Cycle.MatPlot_Default: This is the simulation control object that controls the number of simulation evaluation cycles to be performed in the next simulation run. Open it by double clicking on the object name Default or its icon. You can also right click on the Default object to obtain the context menu and select Properties from the menu. An Object Properties dialog will pop up to show you the attributes of the object. The first Input/Output tab shows the simulation control attributes. The Beginning Cycle Number 1 and the Ending Cycle Number 720 controls the total simulation run for 720 degrees with one degree increment. The cycle here represents the number of steps corresponding to the one degree increasing angles, not the circular cycle in sine or cosine wave generation. Clicking on the Output tab will reveal three more attributes: Matrix Data 1, Matrix Data 2, and Sum of Both Data. These attributes are for output values, either from the matrix look up or calculated results. Ignore the values for now because it may contain residuals from previous simulation runs. Please notice that the three output attributes have blue squares to the right of their data fields under the column labeled as "?". They indicate that the simulation results of the three attributes shall be logged in the Result View in the Bottom Pane. If any of the blue indicators does not appear, click at the center of the empty cell to turn it on. Once you finish examining the attributes, close the Object Properties dialog by clicking on the OK button.
Matrix.MyMatrix_MatrixInstance: This is the matrix of our primary interest in the example. Open the Object Properties dialog by double clicking on the name of the object or its icon. In the Object Properties, it shows you a Data-1 tab with the pre-loaded values in the matrix. The matrix has two columns and 360 rows. The row index represents the angle in degrees with the first column being the sine value and the second column being the cosine value.
To show you the dynamic memory allocation feature in SansGUI while the Object Properties dialog of the MatrixInstance object is opened:
Click on the Specification tab and change the Number of Rows to 1.
A warning message, indicating the matrix size is about to be reduced, is shown. Click on the Yes button to truncate the matrix.
Click on the Data-1 tab to reveal the matrix with only two cell in one row still remaining. The values in the two cells are from the original matrix.
Click on the Load Data button at the lower right corner of the Object Properties dialog. The routines from the simulator are called again to resize the matrix and generate the sine and cosine function values.
A message is shown to confirm the changed values by the external routines. Click on the OK button to close the message box.
Click on the OK button of the Object Properties dialog to close it.
To run the simulation and plot the results:
Click on the Run In-Process button, an arrow pointing to the right, located in the Run toolbar.
SansGUI will ask you if you want to save the changes. Click on the Yes button.
The Operation View in the Bottom Pane will show the trace of the simulation running through 720 cycles (with 720 degrees, or two circular cycles).
Once the simulation ends, click on the Result tab. It shows the values of the three logged attributes associated with the simulation cycle numbers.
All three attributes have a [Y] appended to the attribute codes at the header of the view, meaning that they will be used as Y axis data in the plot.
Click on the Plot Results button in the Run toolbar. A Plot Dialog will be displayed.
An interesting operation is to zoom in the chart by clicking on a point in the chart and dragging the mouse while holding down the button to create a zoom bounding box. After releasing the mouse button, the zoom operation will be in effect with a scroll bar revealed at the bottom of the Plot Results dialog for you to scroll through the horizontal ranges. Click on the left or right arrow button of the scroll bar to see a continuous scrolling effect. To restore the original chart, right click on the chart and select Undo Zoom from the context menu.
Another interesting operation is to use the sine wave data as the X-axis values. Move the plot aside so that you can see the header of the Result View in the Bottom Pane. Right click on the fData1 [Y] header and select Set As X Data from the context menu. The header is now changed to fData1 [X]. Click on the Plot Results button again to refresh the chart. Two ellipses are shown, one for the cosine wave values and the other one for the sum. The sine wave values are now used as X axis data values.
In this section, we examine the implementation of the MatPlot example to get a better understanding of the SansGUI Run-Time Environment. The operations in this section do not require the SansGUI Development Environment; therefore, you can follow through the procedures with any level of SansGUI license (even with the demo version -- SGdemo).
The primary class we will look into is the Matrix.MyMatrix class. With the MatTest.sgp Project Model loaded into the SansGUI environment:
Double click on the name or the icon of the MyMatrix class in the Tree View of the Left Pane. Alternatively, you can right click on the name or the icon of the class to obtain the context menu and then select Properties from it. A Class Properties dialog will appear.
From the Identity tab of the Class Properties, find the Column-Major Data Storage property which has been checked. This means the internal data is ordered in favor of the Fortran programming language or any environment that store multi-dimensional arrays in column-major order, such as MATLAB(tm). This is what the developer decided to do. SansGUI can arrange multi-dimensional arrays in row or column major order on a class by class basis.
Click on the DLL tab next to the Identity tab at the bottom of the Class Properties dialog. The function entry points of the class is revealed.
With the DLL function entry points displayed, let's examine what they mean in this particular project. Each row represents a function entry point and there are two columns of check boxes. The first column of check boxes is labeled as Call and the second column is labeled Override. A check mark in the Call column means the developer has supplied a function for SansGUI to call in a certain situation and a check mark in the Override column means the developer allows the users to override such function by supplying an overriding DLL. Users can override the class function on a per function and per object (or per part) basis. Consult Chapter 6 Overriding Simulator Routines of the SansGUI User's Guide for more details. The four function entry points from the developer supplied DLL (the Call Column) in this example are:
End Edit Check (SG_xEndEdit_Matrix_MyMatrix): This function is called when you click on the Check Data button in an Object Properties dialog. Double click on the MatrixInstance object to open the Object Properties dialog. Clicking on the Check Data button will invoke the routine. This function has nothing but a return value in the supplied DLL; therefore, SansGUI only displays a "Values are checked by external routines" message.
Resize for Load (SG_xLoadSize_Matrix_MyMatrix): This function is called when the user clicks on the Load Data button in an Object Properties dialog. In fact, when the Load Data button is clicked, SansGUI calls this function. When successful, SansGUI immediately calls the Load Data function to be described next. This function is used to make a request for allocating memory to store the matrix according to the specified size and the next function is used to populate the matrix. In the current implementation, MatPlot requests a matrix with 360 rows and 2 columns.
Load Data (SG_xLoad_Matrix_MyMatrix): This function is called immediately after the Resize for Load function above. This routine populates the matrix by generating sine wave and cosine wave data over 360 degrees with 1 degree increments. This routine will not be called during the simulation run; therefore, the data can be edited by hand. Clicking on the Load Data button again will regenerate the values, and thus erase the edited values. This matrix serves as a lookup table during the simulation run.
Evaluation (SG_xEval_Matrix_MyMatrix): This function is called in each evaluation cycle (1 degree step advancement) of the simulation. The number of cycles is controlled by the SimControl.Cycle.MatPlot_Default object. It is currently set to 720 cycles (degrees) for 2 circular cycles of sine and cosine waves. This routine simply looks up the data in the matrix according to the Current Cycle Number and puts these values in the Matrix Data 1 (fData1) and Matrix Data 2 (fData2) output variables. The sum is calculated and stored in the Sum of Both Data (fSum) field.
The source code for the implementation can be found in the MatPlot_1_0_a_4 subdirectory of the MatPlot sample directory. There are two source files implementing class MyMatrix DLL functions:
Matrix_MyMatrix.c: implementation in the C/C++ programming language.
Matrix_MyMatrix.f: implementation in the Fortran programming language.
Separated from the source code directory, the DLL projects are located in MatPlot_1_0 and MatPlot_1_0F for C/C++ and Fortran, respectively. If you have Microsoft Developer Studio (MSVC) or Compaq Visual Fortran (CVF), you can load the workspace (with a .dsw file extension) from either of these directories and open the source file within the development environment. You can even modify the code and recompile the DLL to see how SansGUI works together with the development environments. For example, lets display a message when the user click on the Check Data button in the MatrixInstance Object Properties dialog. Before loading the project workspace into the IDE, you need to include the inc subdirectory of the SansGUI installation directory in your include file search path:
From the Tools menu in your IDE, select Options... and then select the Directories tab.
Select Include Files from the drop-down list under the Show directories for: field.
Add the inc subdirectory of your SansGUI installation directory into the environment and then close all the dialogs.
Now, For MSVC:
Load the MatPlot_1_0.dsw workspace into the IDE and open the Matrix_MyMatrix.c file.
Locate the function SG_xEndEdit_Matrix_MyMatrix(). It is a skeleton function generated by the SansGUI Source Code Framework. No code has been entered manually in this function.
Locate the comment /* TODO: put your simulator code here */ and enter the statement in the next line: strcpy(cMessage, "Hello! Thank you for being here with me.");
Change the return value at the end of the function from return SG_R_OK to (SG_R_LMSG | 2001). The SG_R_LMSG means it is a log message only, not an error and the bitwise-OR operator puts 2001 as the message code defined by you. You can have from 1 to 2^24 (16 million) codes defined. The addition operation (SG_R_LMSG + 2001) should also work.
Make sure you are in either Release or Trace mode (not Debug) and rebuild the DLL.
When the rebuild process is completed, you have obtained a new DLL under the Release or Trace subdirectory of the samples\MatPlot\MatPlot_1_0 directory.
Skip the CVF procedures below and advance to the test section.
For CVF:
Load the MatPlot_1_0F.dsw workspace into the IDE and open the Matrix_MyMatrix.f file.
Locate the function SG_xEndEdit_Matrix_MyMatrix(). It is a skeleton function generated by the SansGUI Source Code Framework. No code has been entered manually in this function.
Locate the comment ! TODO: put your simulator code here and enter the statement in the next line: cMessage='Hello! Thank you for being here with me.'C The ending capital C after the quotation mark is a CVF feature that will make the string NULL-terminated. Make sure it is typed in.
Change the return value at the end of the function from SG_xEndEdit_Matrix_MyMatrix = SG_R_OK to SG_xEndEdit_Matrix_MyMatrix = (SG_R_LMSG + 2001)
In either the Release or Debug mode, rebuild the DLL project.
When the rebuild process is completed, you have obtained a new DLL under the Release or Debug subdirectory of the samples\MatPlot\MatPlot_1_0F directory.
To test your message from the new DLL, do the following:
Run SansGUI and load the MatTest.sgp project.
Double click on the Default object of the SimControl.Cycle.MatPlot class to open the Object Properties dialog.
Right click on the Value cell of the Simulator Program Path attribute to obtain the context menu. Select Input Assistant from the menu.
Click on the <File / Dir...> button in the Input Assistant.
Use the File Locator to find the DLL file you just created. Click on the Open button to select the DLL and close the File Locator.
Click on the OK button to close the Input Assistant.
Click on the OK button to save the change in the Object Properties dialog.
Open the MatrixInstance Object Properties dialog by double clicking on the object in the Tree View.
Click on the Check Data button. If the DLL file is correctly specified, you should see a message box displayed with the message code 2001.
As an exercise, you can modify the DLL to generate different data sets with different sizes and plot the curves.
This section shows how to create the MatPlot project from scratch. You will need the SansGUI Development Environment in order to perform the tasks. If your license option is SGdemo or SGrun, please visit http://protodesign-inc.com/register.htm to obtain an evaluation license key or skip over to the next Point of Attraction.
For the new project, we will use MyPlot as its name throughout.
Run SansGUI. From the File pull-down menu, select New to obtain a New dialog.
From the New dialog, select Schema Definition (.sgs) and click on the OK button. A Simulator Identification dialog will be displayed.
From the Simulator Identification dialog, enter MyPlot as the name of the program. SansGUI uses a red square to show a required field. All other fields with green squares are optional. Click on the OK button to close the Simulator Identification dialog. A new Schema Definition is created.
Right click on the Cycle class under the SimControl class and select Create Subclass from the context menu. A new Class Properties dialog is displayed.
Enter MyPlot as the class name and press the Enter key to create the class. The Class Properties dialog will be closed.
Right click on the XProc class also under the SimControl class and select Create Subclass from the context menu. A new Class Properties dialog is displayed.
Enter MyPlot as the class name and press the Enter key to create the class. We create this class solely for the demonstration of textual Model Files creation.
Click on the third tab, the Reference tab, in the Left Pane and locate the Matrix class.
Right click on the Matrix class and select Create Subclass from the context menu. A new Class Properties dialog is displayed for the new Matrix class.
Enter MyMatrix as the name of the class and click on the Column Major Data Storage check box. We do this to demonstrate the multi-dimensional data array support for Fortran and other column-major order environments.
Click on the DLL tab at the bottom of the Class Properties dialog.
Check the following four entry points in the Override column: 1) End Edit Check, 2) Resize for Load, 3) Load Data, and 4) Evaluation. You may have to scroll down to reveal the Evaluation function entry point. When you click on the check boxes in the Override column, the corresponding check boxes in the Call column are also checked. This means you can create the routines and your users will be able to override your routines. If you do not want your users to override your routines, simply click on the check boxes in the Call column only.
Click on the OK button to close the Class Properties dialog.
Single click on the MyMatrix class in the Tree View. You will see the built-in attributes being displayed in the Grid View in the Right Pane. For matrices, SansGUI creates the specifications for the number of columns, rows, and sheets as intrinsic attributes.
At the New>> row after the Number of Sheets (iSheets) attribute, enter fMatData in the Code column. This fMatData code will be used as the array variable name during the code generation process.
Enter Matrix Data in the second column for the attribute. This is the label of the attribute the users will see.
Use default settings for others. SansGUI automatically uses the single precision floating point type (Real - Single Float) as the default data type.
Click on the first tab, the Simulator tab, to see the SimControl classes.
Click on the MyPlot class under the SimControl.Cycle class. You can see a few pre-defined attributes in the Grid View in the Right Pane. If necessary, scroll the view to the bottom to reveal the New>> empty attribute row.
Enter the following three attribute codes in order: 1) fData1, 2) fData2, and 3) fSum. As soon as you enter an attribute code, a new row will be appended to the grid with the New>> cursor shifting down.
Enter Matrix Data 1, Matrix Data 2, and Sum of Both Data as the attribute labels in the second column for the three attributes above.
From the Scope group, change the default Input/Output scope to Output scope by clicking on the cells of the three attribute in the Output column. We effectively make these three attributes for output only. Keep all other setting as default.
Select Save As from the File pull-down menu. In the Save As dialog, create a new subdirectory MyPlot under the samples directory by clicking on the Create New Folder button in the toolbar. Once the New Folder appears, rename it to MyPlot and then double click on it to make it the current working directory. This means the entire MyPlot project with all the subsequent files will be stored under the directory samples\MyPlot.
Save the Schema Definition using the file name MyPlot (SansGUI will automatically append a .sgs extension) and save it under a newly created subdirectory as samples\MyPlot\MyPlot.sgs.
Now, the Schema Definition has been created. We can generate an Object Library and the source code for implementing the class behavior:
From the Action menu, select DLL Language Options... The displayed dialog shows the languages and the source file extensions of choice when generating the source code. Click OK to close the dialog.
Again, from the Action menu, select Generate Next Build. The Bottom Pane is revealed to show you the process of the Object Library generation and where the source files are generated. If you should encounter any problems, the views in the Bottom Pane should show you exactly where they are.
Once the source files of skeleton code are generated, you can create a DLL project and insert the files into it. We will not show the details of creating the DLL in this tour. Instead, we refer you to the Preparing Development Environments section in Chapter 4 Developing In-Process Simulators in the SansGUI Developer's Guide as the starting point. Basically, what you will need to do are to set up your programming environment, create an empty DLL project, insert the source files, customize the source code, and build the DLL.
In this example, we model a person pushing a ball. The velocity of the ball gives a signal to the person as a feedback on how well he is doing, captured by the progress center in the person's feeling system. There is also a surprise center in the feeling system that takes an input from the progress center. A sudden change of progress results in a jerk in the surprise center. The surprise center is modeled with two leaky capacitors to represent the fading signal levels of such feeling in the person's memory.
At some point of the simulated time, 0.5 minute in this example, the ball is blocked by an obstacle and the velocity is suddenly dropped. This, in turn, blocks out the feeling of progress and causes a jerk to be sent to the surprise center. The signal levels in the progress and surprise centers record the two feelings of the person throughout the event. Each signal passed from a source to a target is carried by a link on the Canvas View. The links are created by using the New Link button on the Build Toolbar.
Open the Project Model Progress.sgp from the samples\Feel directory. There are three parts in the TOP assembly, namely, Ball-17, MyProgress and MySurprise.
Click on the Run In-Process button on the Run Toolbar to run the simulation through 300 evaluation cycles.
Click on the Result tab in the Bottom Pane to see the values of logged attributes (columns) in each cycle (row).
Click on the Plot Results button on the Run Toolbar to generate strip charts for all the logged attributes.
The strip charts show the data generated in 300 cycles with 0.005 minute time increments for a total of 1.5 minutes.
The Schema Definition file is Feel.sgs in the same directory. Click on the Component tab to find out the classes Base.Feeling.Progress, Base.Feeling.Surprise, and Base.Object.
Click on any of the classes in the Left Pane to reveal the attributes of it in the Right Pane.
Each row in the Right Pane represents an attribute in the class. The tabs at the bottom of the Right Pane show the classes being accessed recently.
Right click on any of the names of the attributes to access a context menu for the attribute. Click on the Properties menu item to get an Attribute Properties dialog. This dialog contains all the definitions of the attribute. The definitions in this dialog are contained in a row in the Right Pane. The dialog gives a better view of one particular attribute while the Right Pane shows all the class attributes in a Grid View.
To view the project source code, start Microsoft Visual Studio and load the project workspace Feel_1_0.dsw under the samples\Feel\Feel_1_0 directory. Each .c source file contains functions for each class defined in the Schema Definition.
There is no Fortran implementation in this example.
Thanks to Dr. Peter H. Greene of Illinois Institute of Technology, Chicago, Illinois, for providing this interesting example.
This artificial neural network example implements an Interactive Activation and Competition (IAC) network for inexact, associative, contents-driven database search. It models the profiles of 27 members of two gangs, Jets and Sharks. Each member has five attributes: name, age, marital status, educational level, and occupation. The neural network model has all the possible values in these attributes represented by nodes (Neurons) in clusters. There are 27 "hidden" nodes representing the 27 members, identified by h-Names as the node names. The other 27 nodes cluster represents the name strings of the 27 members. There are clusters for other attributes of the members. For example, the age cluster contains in20s, in30s, and in40s nodes and the educational level cluster contains JuniorHigh, HighSchool, and College nodes. Each attribute cluster is completely connected with inhibition links, meaning that when one is on, or with a high activation level, the others should be suppressed (mutual exclusion). These inhibition links are marked with thin black lines. Each hidden node is connected by excitation links to all the attribute value nodes that match the person's properties. For example, the hidden node h-Ken is connected to the name node Ken, the Sharks node, the in20s node, and so on. These excitation links are marked by thick green lines.
When any node is stimulated, such as Ken with the external input value 1.0, it will generate a "ripple" and propagate through the network according to these excitation and inhibition links. Once the ripple settles, the activation level of each node shows the strength of the relation it has with the ripple originator. Thus, when we set Ken's external input to 1.0 and run 100 cycles, the activation levels shown in the Result tab indicate how strong the nodes are in relation with Ken. You can set in30s and Married to 1.0 and see which gang members are most likely in this group. Before doing so, use Edit>Clear Override Values to clean up the values from the previous simulation run.
Run SansGUI and open JetShark.sgp from samples\IAC directory. Because of the complexity of the network (68 nodes and about 1000 links), it will take a few seconds to load. Maximizing SansGUI and the JetShark document windows will give you a better view of the demonstration.
Once the projected is loaded, you can scroll the Canvas View by
using the scroll bars attached to the canvas,
press the Ctrl key while dragging the canvas using the mouse -- a little hand icon will appear as you drag along, or
use the Pan Window to move the "scope" around.
The Pan Window can be activated by pressing the Pan Win button located on the View Toolbar. If it is grayed out, or disabled, simply click on the canvas once to enable all the toolbar buttons related to the Canvas View. Now we are prepared to run the IAC simulator:
Locate the Component tab on the Left Pane. Click on the Neuron class so that the Right Pane will switch to a Grid View with all the neurons and their values. Check the neuron with the name Ken (not h-Ken) which has its external input set to 1 (shown in red color, representing a part override value). Those values enclosed by a pair of braces and in purple color are symbolic parameters which are bound to certain values in a case-by-case basis. specified in Action>Setup Case Parameters. You can run multiple cases with different parameter bindings in one simulation.
Locate the Run Toolbar buttons on the right side of the SansGUI Environment, they are Run In-Process, Pause/Resume, Step, Fast Forward, Stop, Run External, and Plot Results function buttons.
Click on the Run External button and you should see a "JetShark.txt model file created" message displayed in the Operation tab at the Bottom Pane. After that, a console window will be created to run the external simulator (now demonstrated only by a C program displaying the first 10 comment lines of the generated Model File). The source code of the C program can be found under samples\Head directory. You can use the Notepad program to view the JetShark.txt Model File. Can you find the part override value in Ken in the Model File?
Click on the Run In-Process button (the play button) to start the simulation. It will run 10 cycles and then pause. This is specified in the SimControl object named Default under the Object tab (SimControl.Cycle.IAC_Default). Double click on the Default object to pop up an Object Properties dialog. Locate the Pause at Cycle Number entry which is currently set to 10.
Close the Default simulation control Object Properties dialog by clicking on the OK button.
Click on the Step button on the Run Toolbar a few times to see the Operation View responding with one cycle advancement at each click.
Click on the Pause/Resume button to allow it to run to the end. At any point, you can click on the Pause/Resume button to pause/resume a simulation. Pressing the Stop button will terminate the simulation.
Click on the Result tab to see the simulation output in the Grid View. Click on the Plot Results button on the Run Toolbar to obtain a plot of selected data curves.
Examine the simulation results and you will find a log of values for each screen refresh cycle. These attributes are selected from each part or from certain reference objects. For example, double click on any part to open the Part Properties dialog and check to see the log flag (with a question mark as its column header) being turned on for the activation level attribute.
If you check the Neuron tab in the Right Pane, you may find a lot of red colored numbers showing part override values (because they are set as In/Out attributes). These values can be cleared by the menu selection Edit>Clear Override Values. Set the external inputs to some of the neurons to 1.0, run the simulation again, and then rationalize the results.
There is also a JSgb.sgp Project Model which implements a different IAC update function, as in the original Grossberg's publication. The function is implemented as a user override DLL located in the override subdirectory. Load the JSgb.sgp project and you can find the DLL override values are specified in each objects under Neuron.
Because SansGUI executes simulations in separate threads, multiple simulations from different Project Models can be executed at the same time. Therefore, you don't need to close JetShark.sgp in order to load JSgb.sgp. In fact, you can let the two project tiled against each other via Window>Tiled Horizontally and launch simulations one after the other without waiting for the first one being completed.
The Visual C++ implementation of IAC is similar to that of Cool, except that there are two subcycles in each cycle -- pre-evaluation cycle and evaluation cycle. In the pre-evaluation cycle, the neuron basically sums up all the input levels from all its input links and store the result locally. During the evaluation cycle, the neuron calculates the output according to its transformation function and puts the output level to all its output links. Please consult the references for more descriptions of the IAC model and its mathematical details.
To test the Fortran implementation of IAC, use JetShark.sgp and modify the Default simulation control object by:
Double clicking on SimControl.Cycle.IAC_Default object to pop up the Object Properties dialog.
Right click on the empty Simulation Program Path field to get the Input Assistant.
From the input assistant, click on the <File / Dir...> button and locate the DLL file under IAC_1_0F\Release\IAC_1_0F.DLL. Select it and close the Input Assistant.
The simulation results should be the same as the original JetShark.sgp running with the implementation in C/C++.
The doc\IAC subdirectory of the SansGUI installation directory contains a set of hand-crafted documentation files written in the Hyper-Text Markup Language (HTML). These files demonstrate one means to incorporate on-line, context-sensitive help document into the SansGUI environment. The HTML file names serve as the document entry points of the simulator classes and are entered in the Class Properties dialogs in the Schema Definition of IAC.
Thanks to Dr. James L. McClelland of Carnegie Mellon University, Pittsburgh, Pennsylvania, for giving the permission to use his Jets and Sharks model in this example.
McClelland, James L. 1981. Retrieving General and Specific Knowledge from Stored Knowledge of Specifics, Proceedings of the Third Annual Conference of the Cognitive Science Society, pp. 170-172.
McClelland, James L. and Rumelhart, David E. 1988. Explorations in Parallel Distributed Processing, The MIT Press, Cambridge, Massachusetts.
Rumelhart, David E., McClelland, James L., and the PDP Research Group. 1986. Parallel Distributed Processing, Volume 1: Foundations, The MIT Press, Cambridge, Massachusetts.
In this example, we explore the new interactive 3D graphics features in the SansGUI Modeling and Simulation Environment and demonstrate how SansGUI supports OpenGL® graphics programming directly in Microsoft Visual C++ and Compaq Visual Fortran. With the new Graphics class introduced in SansGUI version 1.2, simulators can incorporate 3-dimensional graphics for scientific or engineering visualization and data exploration.
The Solid simulator contains a class named Solid, which is derived from the new Graphics class. The code in Solid simply calls the OpenGL Auxiliary Library routines aux{Solid|Wire}* to draw 3-dimensional objects. The shapes of the objects can be Tetrahedron, Cube, Octahedron, Dodecahedron, Icosahedron, Box, Cylinder, Cone, Sphere, Torus, or Teapot. They can be displayed in either solid rendering form, or simply in wire frame. Three primitive colors, cyan, magenta, and yellow, can be applied to the objects by the user.
The Solid simulator uses the cycle simulation mechanism in SansGUI to control simulation runs. It rotates the displaying object along the vertical (Y) axis by a hard-coded 5 degree increment each time. The simulation control object has its Ending Cycle Number set to 0, meaning that the simulation will run forever. You will need to use the control buttons in the Run toolbar to stop or pause a simulation.
To quickly try out the new 3D graphics features, open the Shapes Project Model located in the samples\Solid subdirectory of the SansGUI installation directory to load it into the SansGUI environment. The Execution dialogs, including three Graphics dialogs and the Plot Results dialog, will be automatically opened. You can click on the Run In-Process button in the Run toolbar to start the simulation. Should the Execution dialogs not displayed automatically, you can open them manually with the following procedures:
Select the Object tab (the first tab) from the Left Pane.
Scroll the Tree View to the bottom to reveal MySolid, Teapot, and Torus 3D graphics objects.
Right click on MySolid and then select View Object from the context menu.
Do the same on the Teapot and Torus objects to open their Graphics dialogs.
Click on the Plot Results button in the Run toolbar to obtain the Plot Results dialog.
The simulator in this example rotates the graphic objects about the vertical (Y) axis with a specific increment. The Plot Results dialog shows the trace of the Y-rotation angles through time. The horizontal scroll bar has its scroll box running from left to right, corresponding with the rotation angles that are ranged from -180 to +180 degrees. While it is moving, you can grab the scroll box and drag it to any position in the scroll bar to see how the strip chart in the Plot Results dialog responds to your change. With this feature, the simulator can be implemented to allow users to fine tune control variables even when the simulation is running.
Now, let's explore a few more SansGUI run-time features and change some of the 3D object properties:
While the simulation is running, click on the Pause/Resume button next to the Run In-Process button in the Run toolbar. The simulation will be paused.
Click on the Step button next to the Pause/Resume button to perform single stepping. Do it a few times to see how the 3D displays and the result plot change.
At this moment, move the Plot Results dialog away to reveal the Right Pane of the Shapes :Project Model. You can maximize the window by clicking on the Maximize (middle) button on the right side of the Windows title bar of the Project Model so that its Right Pane can be enlarged.
On the Left Pane, scroll down the Tree View so that MySolid, Teapot, and Torus objects are visible. Click on any one of them. You will see the properties of the objects being listed in the Right Pane.
Click on the Solid attribute of the Teapot object under the iType column and select Wireframe. Notice now the Teapot is displayed with a wireframe mesh.
Change any of the properties to your preferences and continue to play with simulation runs, pausing, and single stepping.
Play with object rotation by moving the horizontal and vertical scroll boxes in the Graphics window. You can perform these operations whether the simulation is running or not.
Zoom in and out of the scene by pressing the + or - keys on the numeric keypad.
Please consult the User Interface Controls section of Class Graphics in the SansGUI Reference Manual for a summary of the default user interface operations implemented in the Solid simulator. In the next demonstration, we will explore the user selection feature in the Graphics windows. In this Solid example project, it simply echoes the selection points in the Message View. Other applications may handle the user selections differently.
From the Bottom Pane, click on the Message tab to reveal the Message View.
In a Graphics window, such as the one displaying the Teapot object, move the mouse pointer to any point within the window, press down the left mouse button, drag the mouse pointer while the mouse button is still down, and then release the mouse button for a rectangular selection area.
Watch the message posted in the Message View. The coordinates of the two corner points are displayed.
Repeat the selection on a different Graphics window and examine the message in the Message view. These messages are associated with different objects. The Properties dialogs of the objects can be opened by double clicking on the object names or selecting Properties from the right-click context menu.
In order to capture the 3D graphics images for publication purposes, SansGUI supports hard-copy printing, copying to Windows clipboard, and exporting images to Bitmap (.BMP) or JPEG (.JPG) files. All of these functions can be performed by selecting the corresponding menu items from the right-click context menus in the Graphics windows. For more details, please consult the Solid simulator on-line manual, which can be accessed from the About SansGUI dialog box:
Select Help from the pull-down menu.
From the pull-down menu, select About SansGUI...
In the Installed Simulators list box in the About SansGUI dialog, locate the icon with the name Solid.
Right click on the Solid icon, a What's this? menu is displayed.
Click on What's this?, your Internet browser will be invoked to display the Solid simulator on-line manual.
On-line manual pages specific to Solid classes and objects can also be accessed by clicking on the large icon buttons at the upper-left corner of the associated Properties dialogs.
Once you have the SansGUI Professional Edition license key installed, you can open the Schema Definition file of Solid (Solid.sgs) from the samples\Solid subdirectory of the SansGUI installation directory. In addition to the regular In-Process and External Process simulation control classes, there is only one class, <Reference>Graphics.Solid, created for this particular simulator. You can find its definitions with the following procedures:
Open the Solid.sgs Schema Definition file from the samples\Solid directory.
Select the Reference tab (the third tab) in the Left Pane.
Click on the Solid class to see all the attributes being displayed in the Right Pane.
The attributes with a light yellow color, or the background color set for pop-up tips in your Windows environment, are inherited from its parent, the Graphics class. These intrinsic attributes are updated by SansGUI in the SansGUI Data Objects, used by SansGUI to communicate with the simulator.
The last four attributes, iShape, iColor, iType, and fAngle, are created specifically for the Solid simulator. The first three are enumerated items while the last one contains a copy of the Y-Axis rotation angle for plotting purposes.
Double click on the Solid class in the Left Pane to open its Class Properties dialog.
From the Identity tab, you can see the Documentation Location field is filled with an HTML file path. We use this to indicate which on-line page shall be opened when the user clicks on the large icon button in the Graphics Object Properties dialogs.
Click on the DLL tab. You can see four DLL function entry points being checked: Begin Run, Pre-Evaluation, Evaluation, and Post-Evaluation. Please consult the Class Graphics reference pages in the SansGUI Reference Manual for their function call semantics.
Click on the Cancel button to close the Class Properties dialog.
The project workspaces for building the Solid simulator DLL in Microsoft Visual C++ 6.0 and Compaq Visual Fortran 6.x are included in the samples\Solid\Solid_1_0 and samples\Solid_Solid_1_0F subdirectories, respectively. You can load any one of the two project workspaces to access the source code, modify them, and the rebuild the DLLs. There is only one source file associated with the <Reference>Graphics.Solid class in each project workspace. It is the only one needed in the Solid simulator. Please read the comments in the source code and consult the Class Graphics reference pages to find out how to set up the rendering context, respond to window resizing messages, render scene, and respond to user selections. If you would like to rebuild the DLL, please read the OpenGL Auxiliary Library bug fixes information in the Acknowledgements section right after the Developer's Corner.
The intrinsic attributes in class Graphics are defined as hidden; they are hidden from the user in the SansGUI Run-Time Environment with a password protection. The password for the Solid simulator is actually not set (or set as a blank string). You can enter a Service Session by selecting Tools>Service Session... from the pull-down menu in the Shapes Project Model and click on the OK button without entering anything in the Enter Password field. Once a service session is entered, all the hidden attributes associated the the Graphics objects can be revealed in the Right Pane and in the Object Properties dialogs.
The doc\Solid subdirectory of the SansGUI installation directory contains a set of hand-crafted documentation files written in the Hyper-Text Markup Language (HTML). These files demonstrate one means to incorporate on-line help document into the SansGUI environment. The HTML file names serve as the document entry points of the simulator classes and are entered in the Class Properties dialogs in the Schema Definition of Solid.
The Solid example uses aux{Wire|Solid}* 3D object drawing routines in the OpenGL Auxiliary Library from Silicon Graphics, Inc. The original GLAUX.LIB distributed with Microsoft Windows contains quite a few bugs in these drawing routines and was compiled and linked with using single-threaded libraries option. It caused abnormal drawing behavior and C run-time library routine conflicts in the Solid example. We would like to thank Richard S. Wright, Jr., the author of OpenGL SuperBible, for sending us the GLAUX source code with his bug fixes and his permission to redistribute the fixed code.
We have created a project workspace in Microsoft Visual Studio and rebuilt the library with the Multi-threaded DLL option set so that the C run-time library will not be conflicted. The newly built GLAUX.LIB can be found in the sys subdirectory of the SansGUI installation directory. You should backup the old GLAUX.LIB and use the new one if you would like to rebuild Solid or create any project that uses GLAUX. The source files of GLAUX are included in a zip file named GLAUXM.ZIP, which can also be found in the sys subdirectory.
Fosner, R. 1997. OpenGL Programming for Windows 95 and Windows NT, Addison-Wesley, Reading, Massachusetts.
Lawrence, N. 2002. Compaq Visual Fortran: A Guide to Creating Windows Applications, Digital Press, Boston, Massachusetts.
Woo, M., Neider, J., Davis, T., and Shreiner, D., OpenGL Architecture Review Board. 1999. OpenGL Programming Guide: The Official Guide to Learning OpenGL, Version 1.2, 3/e, Addison-Wesley, Reading, Massachusetts.
Wright, R. S., Jr., and Sweet, M. R. 1999. OpenGL SuperBible, 2/e, Waite Group Press, Corte Madera, California.
This example demonstrates a few classes with special properties and the schema evolution process when there are class attribute changes. The Schema Definition file of interest is located at samples\Salty\Salty.sgs. You need to open it by File>Open to obtain the Open file dialog. Notice that the default file type is Project Model; therefore, you need to change it to Schema Definition in the Files of Type field. We will examine the following classes:
Collection.Molecule.TestCol: contains a collection of attributes. The Matrix - Single Precision (fMatrix) attribute allows a simple matrix to be entered in the form [a11 a12;a21 a22;...]. The internal data storage is in column-major order so that it can be directly compatible with Fortran or mathematical software packages such as MATLAB(tm).
Collection.Molecule.TestRow: contains all possible GUI controls for testing purposes. The last attribute Temperature with Quality (fTemp) demonstrates the use of the Qualitative Input Assistant.
Matrix.ProfileCol: is a class for multi-dimensional (up to the 3rd dimension) matrices with a single attribute. The internal data storage is in column-major order.
Matrix.ProfileRow: is also a matrix class but with row-major order data storage (as in the C programming language).
Table.ColCol-Plant: is a column-oriented table with a column of data for each attribute. The internal data storage is in column-major order.
Table.ColRow-Animal: is a column-oriented table with a column of data for each attribute. The internal data storage is in row-major order.
Table.RowCol-Constant: is a row-oriented table with a row of data for each attribute. The internal data storage is in column-major order.
Table.RowRow-Constant: is a row-oriented table with a row of data for each attribute. The internal data storage is in row-major order.
Base.Animal and its subclasses: demonstrate attribute inheritance from the super classes of a class.
Base.Plant: shows attributes that require reference objects.
Link.Signal: shows links that carry values.
Once you have the Salty.sgs Schema Definition loaded, please examine the above classes by clicking on the class names. A list of attributes is shown in the Grid View in the Right Pane for each class. You can also double click on the class name, or use Context Menu>Properties to obtain a pop-up Class Properties dialog to view its Identity, DLL specifications, Port definitions, and Connectivity specifications. The last two views are only available to component classes, except for the link class. The DLL specifications are available to both reference and component classes, except, again, for the link class. In the Identity tab, the Column-Major Data Storage field indicates the data storage compatibility in that class. The Class Properties dialog is non-modal, meaning that you don't need to close one in order to open another.
For this hands-on session, we will create an Object Library and a Project Model using the Object Library. During the whole session, we can leave Salty.sgs open.
Use File>New to obtain a New dialog. Select Object Library (.sgo) for the new file creation. An Object Library - Select dialog pops up.
Click on the Salty-L program in the list to select it into the Base Object Library field and click on OK to commit the selection.
A new Object Library file is created. Let's save it now with File>Save As... and save it under samples\Salty\myMarine.sgo
Please note that the SGobj1 is a generic name and we normally don't use it as the name of our files.
Click on the Reference tab in the Left Pane. Right click on the Collection.Molecule.TestRow class and choose Create/Clone Object from the context menu. An Object Properties dialog pops up for the creation of a new object.
Type in MyMolecule in the object's name field.
Try to type in some values in the value fields of the attributes. If you don't know what data types are associated with the fields, right click on the field to access the Input Assistant. Also, there is a colored box next to each attribute. A red box means the value is required but not yet entered. A green box means the value is entered or not required. There is also a yellow box shown whenever the data field is being edited.
You can also select new units from the drop down lists in the unit column.
Click on the OK button to commit the creation of MyMolecule object.
Click on the Component tab in the Left Pane.
Create a new object called MyFavorite from the Base.Animal.Whale.Beluga class. Again, enter a few values for the object before clicking on the OK button.
Save the Object Library by clicking on the Save button on the File Toolbar.
We will now create a Project Model from the newly created Object Library:
From the File>New dialog, select Project Model for the file to be created.
Instead of selecting from the program list, click on the Browse... button. An Object Library Locator dialog pops up and lists out all the Object Libraries installed in the lib directory of the installation. Go up one directory level and then locate the samples\Salty\myMarine.sgo file you just created. Select it and click on the Open button.
Click on the OK button on the Project Model - Creation dialog. A new Project Model is created with an empty TOP level canvas. Save the file as MyOcean.sgp using File>Save As...
Click on the Base.Animal.Whale.Beluga_MyFavorite object once to select it into the Object Toolbox.
Make sure the TOP level Canvas View is in the Right Pane and activated with the View and Build Toolbar buttons in color. If not, click on the Canvas View once.
Click on the New Part button on the Build Toolbar.
Create a couple of MyFavorite Beluga Whales on the canvas by clicking on the empty spots.
Save the Project Model by clicking on the Save button on the File Toolbar.
For schema version evolution, we will introduce a Depth from the Sea Level attribute in the Whale class:
Click on the Salty: SchemaDefinition tab in the SansGUI Modeling and Simulation Environment to put the Schema Definition into view.
Click once on the Base.Animal.Whale class under the Component tab.
From the attribute Grid View in the Right Pane, scroll to the last empty row with a New>> indicator in the row header.
Type in fDepth in the Code column and Depth from the Sea Level in the attribute name column.
Move the current cell to the Allow Part Override column and press the Spacebar key to toggle it on.
Scroll to the right to reveal the Unit Reference column. Select Length from the drop down list.
Click on the row header (with a number 8 as its index) to select the whole row. It is displayed in a reversed video.
Drag the row up to right after the Location Reference attribute. A thin red line gives you a visual cue while you are dragging it.
Notice that the color box at the upper left corner of the Grid View has turned into yellow to indicate that this class has been modified.
Select Action>Generate Next Build to compile the new Schema Definition into a new Object Library. It will be created in the same directory as Salty.sgs.
Now the new Object Library is created, we will update MyMarine.sgo and MyOcean.sgp:
Click on the MyMarine :ObjectLibrary tab to put the document into view.
Use File>Update Version to obtain the Object Library - Select dialog. Again, use the Browse... button to open the Salty_1_0.sgo file created in the samples\Salty directory.
Click OK to close the Object Library - Select dialog. A version update confirmation message will pop up. Click OK to perform the update.
Once it is done, check the MyFavorite object to see if the new Depth from the Sea Level attribute is properly added.
Do the same for the MyOcean.sgp Project Model. In MyOcean.sgp, the parts created on the canvas should have been updated also. Double click on the parts on the Canvas View to examine the new data.
Congratulations. You have finished the tour in the SansGUI's Getting Started guide. The next thing to do is to check the To Go Further section and learn more about the wonderful features in the SansGUI software that you can benefit from.
SansGUI Modeling and Simulation Environment Version 1.2
Copyright © 2000-2003 ProtoDesign, Inc. All rights reserved.